Isn't it funny how you can put -licious on the end of pretty much any word these days? I actually just googled "licious" and these websites came up: candle-licious, mama-licious, cycle-licious, picklelicious, vegan-licious, madonna-licious; I could go on and on. Google it yourself and see.
Anyway I found this recipe for a summer stew and I'll just say right now that I am absolutely in love with it therefore I deemed it worthy of the "licious" tag.
This is my first eggplant recipe which I am finally getting around to posting. I've actually made this recipe twice in ten days! It's perfect for summer, perfect for lunch or dinner and a perfect way to use up your vegetables from your garden.
Eggplant, Zucchini and Sweet Red Pepper Stew
4 servings (actually way more than 4 servings I think)
1 eggplant, cut into 1 inch cubes
1/4 cup olive oil
1 cup chopped onion
5 cloves garlic, chopped or minced
1/2 cup basmati rice
1 zucchini, cut into large chunks
1 red bell pepper, chopped
1 can diced tomatoes, Italian style
1 cup Marsala wine
2 - 2 1/2 cups water
1/2 tsp salt, or to taste
1/4 tsp red pepper flakes
1/4 cup chopped fresh basil
1/4 cup chopped fresh parsley
1 sprig fresh rosemary, chopped
Place eggplant in a colander and sprinkle with salt. I peeled my eggplant too by the way. This is what an eggplant looks like on the inside in case you didn't know.
Heat olive oil in a Dutch oven or large pot. Add onion and saute until transparent. Stir in garlic and cook 1-2 more minutes. Meanwhile rinse eggplant and pat dry. Add to pot with onions and garlic and cook until slightly browned (only a few minutes).
Stir in wine. Now take a minute and breath in all the Marsala goodness before you continue. The Marsala wine makes the whole thing smell so good. Then add 2 cups of the water, rice, zucchini, red bell pepper, tomatoes, salt and red pepper flakes. Cook over medium-high heat until mixture reaches a low boil. Reduce heat and simmer 45 minutes, or until vegetables are tender. Add more water if necessary.
Remove from heat and stir in basil, parsley and rosemary.
You can find the original recipe here. I made a few changes. First I switched the order on cooking the onions and eggplant. The first time I made this recipe I made it exactly as written and cooked the eggplant first. The eggplant soaked up all the oil and there wasn't any left to cook the onions and garlic. The second time I took the advice of one of the reviewers on All Recipes and cooked the onion and garlic first and then added the eggplant. I thought that worked a lot better.
Second, I increased the water by a full cup. There just wasn't quite enough to cover all the vegetables. That could be because I used a pretty big zucchini, eggplant and red pepper.
Third I substituted a can of Italian diced tomatoes for fresh tomatoes only because I don't have any fresh tomatoes right now and I had this can of diced tomatoes already on hand. When the tomatoes finally ripen in my garden I will be making this with fresh tomatoes. I will also use my yellow bell peppers too!
This recipe is SO good. I'm really glad I found it. It has the best flavor. It also freezes really well. The second batch that I just made went straight into the freezer in my favorite Pyrex bowls.
I had picked an eggplant the day before and I knew I needed to use it right away so I whipped up this stew again since I already knew how to make it and knew I liked it. It makes a really great lunch too - very filling. That's the primary reason I freeze it in these individual bowls. I just grab one of these bowls out of the freezer in the morning, let it set on my desk all day and then pop it in the microwave at lunch time. Just to warn you though that the bowl will sweat all over your desk as it thaws out so make sure you set it on a plate or on some paper towels or something.
I love finding awesome recipes!
Other zucchini recipes:
Zucchini Pie (I just posted an update here so go check it out again)
Zucchini Cake
Zucchini with toasted walnuts
Thursday, July 31, 2008
Wednesday, July 30, 2008
Green Beans and Feta
I found this receipe on the inside of the lid to my Athenos feta cheese. The instant I saw it I knew I would make it. Greens beans and feta together? What a fantastic idea. Feta is good on lots of things but I had never really thought about putting it on green beans before.
Green Beans and Feta with Dill
2 lbs fresh green beans
1/2 cup Kraft Zesty Italian dressing
1/4 cup Athenos crumbled feta cheese
1/4 cup chopped red onion
1/4 cup chopped fresh dill
Cook beans in boiling water seven minutes or until tender crisp (I don't like soggy beans so I cooked mine only five minutes). Drain then rinse with cold water.
Toss beans with dressing, cheese, onion and dill in large bowl (my store didn't have fresh dill so I had to used a sprinkling of dried dill instead).
Serve immediately or refrigerate for several hours until chilled.
Doesn't it look delicious? I really, really liked this recipe. Super simple and quick to make. I will be making this again I am sure. I have plenty of green beans from the garden that need to be eaten!
One note on the Kraft Zesty Italian salad dressing - this dressing is awesome. I love it and usually have it on hand. I buy the light version which tastes great and has only 25 calories per serving. It's perfect on salads.
Tuesday, July 29, 2008
CSA: Week 11
This week I received:
FOUR ears of corn (yeah!)
1 cucumber
1 radish
a bunch of small yellow tomatoes
a bunch of cherry tomatoes
one dozen eggs
The corn was really good last week so I was keeping my fingers crossed for more corn this week. I was really glad to see double the amount!
I used the yellow tomato from last week to make another batch of homemade salsa. It was even better than the first batch and was gobbled up in a matter of days. I plan to make more immediately.
I have tried a ton of new recipes recently but I haven't had much time to get them posted. I am going to try to get them posted soon.
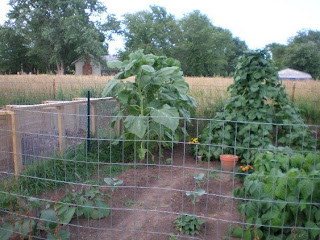
The garden is looking great. I think the beans are winding up their production cycle. We were able to save a couple of the zucchini plants so we are still getting a few zucchinis (though not in the same large quantities thank goodness). Okra has really ramped up so I will be trying out some okra recipes soon. There are currently SIX eggplants on the two eggplant plants so I will also be cooking up tons of eggplant. The tomatoes are finally starting to ripen. I have a feeling it will be a flood of tomatoes in the next couple of weeks. Tomato sauce and salsa here I come. One last note, the sunflowers FINALLY have yellow petals on them but the darn things are so tall I can barely see them! I will post pictures of all of this soon.
Previous CSA posts:
CSA: Week 10
CSA: Week 9
CSA: Week 8
CSA: Week 7
CSA: Week 6
CSA: Week 5
CSA: Week 4
CSA: Week 3
CSA: Week 2
CSA: Week 1
Monday, July 28, 2008
Zucchini Brownies (or Cake?)
My quest to use up my never-ending supply of zucchini and my unsatiable sweet tooth led me to this recipe for Zucchini Brownies.
Zucchini Brownies
24 servings
2 cups all-purpose flour
1 tsp salt
1 1/2 tsp baking soda
1/3 cup unsweetened cocoa powder
1 cup white sugar
2 eggs
2 cups grated zucchini
1/2 cup vegetable oil
1 tsp vanilla extract
1/2 cup chopped walnuts
Preheat oven to 350 degrees F. Grease a 10 x 15 inch jelly roll pan (I don't have one of these so I used a 9 x 13 glass pan).
In a large mixing bowl sift (or whisk) together flour, salt, baking soda, cocoa powder, and sugar. In another bowl combine eggs, zucchini, oil and vanilla. Blend wet ingredients into dry ingredients. Stir in walnuts.
Bake for 20 minutes in preheated oven. Allow pan to cool, then cut into bars.
I actually forgot to stir in the walnuts before I poured the batter into the pan so I sprinkled them across the top before I put the pan in the oven.
So how did it taste? Good and moist and not at all like zucchini actually. You can't even tell there's zucchini in it:
I bet if you took these to a party no one would guess there is zucchini in there. My only complaint on this recipe is that it's more like a cake than a brownie. If I made this recipe again I think I would use only one egg instead of two to try to get to a more dense brownie-like texture. The cake/brownie still tasted great and did not dry out at all, even after several days.
Overall I liked the recipe and zucchini brownies are a good way to use up any extra zucchini you have. However I don't know if I would make these if I didn't have extra zucchinis. I would probably just make regular brownies.
Check out other zucchini recipes:
Zucchini Pie
Zucchini with Toasted Walnuts
Zucchini Brownies
24 servings
2 cups all-purpose flour
1 tsp salt
1 1/2 tsp baking soda
1/3 cup unsweetened cocoa powder
1 cup white sugar
2 eggs
2 cups grated zucchini
1/2 cup vegetable oil
1 tsp vanilla extract
1/2 cup chopped walnuts
Preheat oven to 350 degrees F. Grease a 10 x 15 inch jelly roll pan (I don't have one of these so I used a 9 x 13 glass pan).
In a large mixing bowl sift (or whisk) together flour, salt, baking soda, cocoa powder, and sugar. In another bowl combine eggs, zucchini, oil and vanilla. Blend wet ingredients into dry ingredients. Stir in walnuts.
Bake for 20 minutes in preheated oven. Allow pan to cool, then cut into bars.
I actually forgot to stir in the walnuts before I poured the batter into the pan so I sprinkled them across the top before I put the pan in the oven.
So how did it taste? Good and moist and not at all like zucchini actually. You can't even tell there's zucchini in it:
I bet if you took these to a party no one would guess there is zucchini in there. My only complaint on this recipe is that it's more like a cake than a brownie. If I made this recipe again I think I would use only one egg instead of two to try to get to a more dense brownie-like texture. The cake/brownie still tasted great and did not dry out at all, even after several days.
Overall I liked the recipe and zucchini brownies are a good way to use up any extra zucchini you have. However I don't know if I would make these if I didn't have extra zucchinis. I would probably just make regular brownies.
Check out other zucchini recipes:
Zucchini Pie
Zucchini with Toasted Walnuts
Sunday, July 27, 2008
That Watermelon Is A Liar!
Two weeks ago I was out in my garden, per the usual. After inspecting everything, I moseyed on over to the watermelons to check out their growth. When the watermelons first started growing I had 10-15 little melons on the vines. Now I could only see 5or 6 big ones. I checked around the vines and found the spots where I had laid down grass mulch under a tiny melon only to find there was no longer a melon in that spot, only a vine stump. Seems like my watermelon plants can only support so many watermelons at a time.
I really, really wanted to pick one of the melons. They are the Sugar Baby variety so they are not supposed to grow very large. I thought surely the big one was ripe. I even knocked on it and it sounded hollow. I held off though and did not pick the watermelon.
That night I was reading about melons in my gardening book and it said that a melon is ripe when the rind turns dark green (which my melon was!) and it sounds hollow when you knock on it (which my melon did!). Hmmm I thought. I better pick this melon. I thought about it all night and decided that yes I should pick it. I started getting really excited about having watermelon to eat in my lunch.
The next morning before work I went out to the garden and clipped the big watermelon right off the vine. I brought it in. It weighed about five pounds.
And then the moment of truth. I cut the melon right in half and this is what I found:
That punk melon was not ripe at all!!!!!!!!!!!!!!!!!!!!!!!!!!!!!!!!! It tricked me!
Oh I was so upset and disappointed. Once you pick a watermelon there's no way to ripen it afterwards. It's not like a tomato where you can just set it in the window for a day or two to ripen it up.
I vowed right then not to pick any melons for at least a week. It's been two weeks now and I still haven't picked any. They are getting really big but I'm afraid to pick one again! What if it's not ripe? Then another melon will be wasted!
I had to chop that melon up and feed it to the compost. Ugh!
Saturday, July 26, 2008
Homemade Pesto
Last week I cut down a bunch of my basil plants so I could make homemade pesto. I love pesto. It's so versatile and delicious. You can put it on almost anything.
My friend Katie (the same Katie of the pizza and oreo recipes) forwarded me this recipe from Epicurious. She also grows her own basil and makes her own pesto too.
Pesto
Approximately 1 1/3 cups
3 large garlic cloves
1/2 cup pine nuts
2oz Parmigiano-Reggiano, coarsly grated (2/3 cup)
1 tsp salt
1/2 tsp black pepper
3 cups loosely packed fresh basil
2/3 cup extra-virgin olive oil
With food processor running, drop in garlic and finely chop. Stop motor and add nuts, cheese, salt, pepper and basil, then process until finely chopped. Stop and scrap down bowl if needed. With motor running again, add oil, blending until incorporated.
Pesto keeps, its surface covered with plastic wrap, chilled, one week.
It looks like green glop.
I put half of it in the freezer and the rest in the fridge. Let me tell you it turned out fantastic. I used good olive oil and real Parmigiano-Reggiano that I grated myself. So far I've used it on fish, pasta and potatoes but there are many, many other uses for pesto. Check out My Sister's Kitchen for some other suggestions. One other idea that's not on that site is to mix it with mayo and spread it on sandwiches.
I plan to make as much as possible and freeze it in small 1/2 cup Gladware containers. It is great to have on hand to toss with pasta for a quick dinner.
Tuesday, July 22, 2008
CSA: Week 10
Wow 10 weeks of the CSA are already down. We're not even halfway there yet because the CSA program is 24 weeks total. Bring on the fresh farm food!
This week I received:
2 ears corn!
1 cucumber
1 yellow squash
1 yellow tomato
4 small salad tomatoes
3 radishes
1 spring oregano
I gotta say, I have really been enjoying this program so far. I've tried several new veggies that I might not ever have tried otherwise. I've been able to get to know the couple that runs the farm a bit after seeing them every week for the past 10 weeks. I look forward to picking up my share every Tuesday night and the surprise of what I might get, especially now that we are getting some larger veggies.
If you think you might want to join a CSA for 2009, start researching them now. Most CSAs that I found in my area were sold out way before the season started. I was lucky to get in on this one because it was the first year. I would suggest getting on a couple of waiting lists now that way if people do not renew for 2009 you'll already be on the list of people to call to fill their spots. Find CSAs in your area by going to Local Harvest. That's how I found mine!
Previous CSA posts:
CSA: Week 9
CSA: Week 8
CSA: Week 7
CSA: Week 6
CSA: Week 5
CSA: Week 4
CSA: Week 3
CSA: Week 2
CSA: Week 1
Monday, July 21, 2008
Quick Garden Update & 100th Post!
This is my 100th post! Yeaaaaa, woooooo, ahhhhhhh!
Ok back to normal. I forgot to take my camera out to the garden this evening so I don't have any pictures of the plants. But I do have a picture of yesterday's harvest which was a bit more exciting than previous harvests...
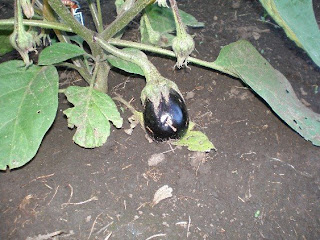
...because I picked that eggplant! Now I don't know anything about eggplant so I have no clue if it is ripe or not. But I read a lot about eggplant online and it seems like it's one of those vegetables that can't be picked too early but it CAN be picked too late. So since it was a pretty good size I went ahead and picked it. I actually cooked it up tonight so watch for an eggplant recipe to be posted soon on here.
I also picked one okra and a whole mess of basil along with the usual green beans and zucchini. I plan to make a boatload of homemade pesto and pack my freezer with it. I can't think of anything better than a freezer full of homemade pesto. I LOVE it. I am going to go ahead and cut my basil plants all the way down so hopefully they have enough time to grow back before the first frost. That way I can harvest them again for MORE PESTO.
Everything else in the garden is looking pretty good. There are many green tomatoes on all the plants. There are 5-6 watermelons that are a good size. Each pepper plant has at least 5 peppers on it. There are four of them so that means there are at least 20 peppers! There are several more eggplants growing. The strawberries have started growing again and I've picked 3 or 4 berries in the past few days.
What else is there? Oh yes the broccoli looks pretty strong. I wasn't sure if it was going to make it but it looks good now and I'm more optimistic that we will actually get some broccoli off a couple of the plants. The okra has started producing and each plant has 1-2 okras on it. The bush beans are still producing however there are quite a few beetles on them and a lot of the beans have little bug bites taken out (I just cut that part off!).
The sunflowers are at least 10 feet tall now.
And now for the bad news. The zucchinis are on their way out. Honestly I am not that sad about it considering we have picked 51 zucchinis so far this year. They are infested with squash vine borers and squash bugs (I also read about this online - I googled "my zucchini plant is wilting").
The support for the pole beans has collapsed. So the pole beans are just laying over on the ground. To tell you the truth these plants have become a huge pain in the you-know-what. They looked neat at first winding up the supports. But then they just kept growing and growing and growing and growing. And the mass of vines got more and more tangled and I couldn't even find where any beans were growing. The few beans that I have found have been tiny little things compared to the bush beans. I don't think we will be planting pole beans next year. The bush beans have been such great producers that I think we will just plant more of them instead.
I'm tempted to just dig up the whole lot of pole beans so I can plant something else in that space. There are several fall crops that could be planted - spinach, swiss chard, winter squash, lettuce, maybe some peas. I would love to try something new and the pole beans aren't really doing anything anyway. What a disappointment they were. Oh well - live and learn!
Sunday, July 20, 2008
Zucchini Pie
In my quest to find ways to use up my zucchinis I came across this recipe for Zucchini Pie. It appeared to be similar to a recipe I used to make all the time called Cheeseburger Pie, which I acquired from the back of a Bisquick box.
I used all zucchini instead of half zucchini and half yellow squash and left out the tomatoes (because I didn't have any). Here's how I made it:
Zucchini Pie
6 servings
4 eggs
1/4 cup vegetable oil
salt and pepper to taste
1 tsp baking powder
1 cup all-purpose baking mix
3 cups thinly sliced zucchini
1/4 cup chopped onion
1/4 cup grated Parmesan cheese
Preheat oven to 350 degrees F. Lightly grease a 9 inch deep dish pie plate.
Whisk together eggs and oil in a bowl with salt and pepper. Stir in baking powder and baking mix until moistened. Gently fold in zucchini and onion. Pour into prepared pie plate. Sprinkle with Parmesan cheese.
Bake in preheated oven until puffed and golden brown, about 35 minutes.
It turned out pretty decent. It was a bit dry but overall I liked it. It was good reheated and I ate the leftovers for lunch the next day.
Then another day later I had one lonely grape tomato from the garden and I decided to cut it up and put it on top of the last slice of pie:
It was a pretty big grape tomato so it went a long way. It was good with the tomato on top!
I plan to make this recipe again because it is a good way to use up extra zucchini. I think the next time I make it I will add some shredded mozzarella or monterey jack cheese to the egg-zucchini mixture before pouring it into the pie plate.
Update 7-31-08: I made this recipe again and this time I used half zucchini and half squash. I also stirred a handful of mozzarella cheese into the squash-egg mixture as well as a few chopped grape tomatoes from the garden before spreading the mixture into the pie plate. Then I grated real Parmigiano-Reggiano (leftover from making pesto) over the top of the pie. Then I popped it in the oven and baked as I did before. The result was very delicious and a great improvement upon the first try above. Adding the mozzarella cheese really helped the dryness and the tomatoes gave it an extra kick of flavor. FIL was over at the house today and he liked it so much that he ate HALF the pie in one day. LOL.
Saturday, July 19, 2008
Homemade Local Salsa
So a couple weeks ago I received a banana pepper in my weekly CSA share. I didn't really know what to do with it. It sat in my fridge for a week. Then I went out of town and came back and it was still in my fridge. Hmmm what to do what to do what to do - aha SALSA!
The thing I love about salsa is that its so personal. It's like chili. Everyone has their own special, secret recipe with all the ingredients that they love.
Well that's actually not me. I've never really made homemade salsa before. My husband has tried making it a few times (note the "tried") and it never quite turned out. So it hasn't been something that we make on a regular basis. We usually just buy it. But seriously how hard can it be? Chop up a bunch of stuff and throw in a bowl. Eat with chips. Wait...was that just an insult to my husband? Sorry! :)
Plus I am about to have a large quantity of tomatoes from my garden so this would be a good practice recipe. Here's what I did:
1 tomato, medium to large
1 banana pepper
1/3 cup chopped red onion (didn't actually measure, this is just an estimate)
Cilantro leaves
1 clove garlic, pressed or chopped
1/2 tsp salt
1/4 tsp white pepper
2 yellow cherry tomatoes, chopped
Quarter the tomato. Put one quarter into the Magic Bullet (or other food processor) and whirl until slightly liquidy but still chunky. Pour out into a bowl. Chop remaining tomato and add to bowl. Add remaining ingredients. Stir to combine and refrigerate. Let sit in fridge for a few hours to allow flavors to develop.
That's it - super easy. It just takes time to chop all that stuff up. The neat thing about this salsa is that most everything I used to make it was locally grown. The banana pepper and yellow cherry tomatoes came from my CSA shares. I bought the tomato, red onions and cilantro at the farmers' market. The only ingredients that are not local is the garlic, salt and pepper. I think that is acceptable. Even the chips I bought are local. They are Sylvia's and they are the best.
It looked a lot prettier when I first made it. It would probably look a lot better if I had it in a nice bowl instead of that old plastic container. But who cares! It tastes awesome! I'll definitely be making this again once I have tomatoes from my garden. I think I might make it in large batches and can it. What a treat in the winter!
Thursday, July 17, 2008
My Favorite Way to Eat Zucchini
I feel like I have been talking a lot about zucchini. Well it's not going to end anytime soon I don't think as I have picked a total of 35 zucchini thus far this season. Unless my plants die. Which is entirely possible as I think at least one plant is infected with squash vine borers. They are scary killers of zucchini plants.
Anyway I have a lot of zucchini in my fridge. I have been freezing quite a bit but I also just eat it because it is one of my favorite vegetables. And my favorite way to eat zucchini is this:
Zucchini with Toasted Walnuts
2 servings
1 large zucchini or 2 smaller zucchinis (smaller ones taste better - don't get the big mama jama because it appears to be a better value)
Walnuts, chopped
Olive oil
Salt and pepper
In a skillet heat 1-2 tablespoons of olive oil over medium heat. I never measure this actually. I just swirl a good amount into the pan. Once oil is warm toss in the walnuts. Use as many as you like. I also make sure some of the walnut "dust" gets into the pan too because it gets stuck to the zucchini and makes it taste even better!
Toast the walnuts in the olive oil in the pan for a few minutes or until the nuts start to give off their aroma.
Meanwhile slice the zucchini into rounds about 1/4 inch thick. For large rounds slice them again into half moons. Lay the cut pieces out flat on the cutting board and sprinkle them with salt and pepper. Flip them over. Sprinkle the backside with more salt and pepper.
Toss the seasoned zucchini rounds into the pan. Cook until desired donenesss. The zucchini will start to become transparent the more done they are. I like mine a little firm so I don't cook them too long. Make sure you flip them over and sear the back too.
Once they are done, transfer them to plates and allow to cool (they get very, very hot!). If desired sprinkle with fresh parmesan or mozarella cheese. The cheese is not necessary if you don't have any on hand. I make this dish all the time without cheese and it is just as good.
I love this recipe because it is fast and simple and it tastes really, really good. I love walnuts and put them in almost everything however this dish works with other kinds of nuts too. I've made it with pecans and it turned out very good then too. You can also use half zucchini and half yellow squash to give it a little more color.
Bon appetit!
Anyway I have a lot of zucchini in my fridge. I have been freezing quite a bit but I also just eat it because it is one of my favorite vegetables. And my favorite way to eat zucchini is this:
Zucchini with Toasted Walnuts
2 servings
1 large zucchini or 2 smaller zucchinis (smaller ones taste better - don't get the big mama jama because it appears to be a better value)
Walnuts, chopped
Olive oil
Salt and pepper
In a skillet heat 1-2 tablespoons of olive oil over medium heat. I never measure this actually. I just swirl a good amount into the pan. Once oil is warm toss in the walnuts. Use as many as you like. I also make sure some of the walnut "dust" gets into the pan too because it gets stuck to the zucchini and makes it taste even better!
Toast the walnuts in the olive oil in the pan for a few minutes or until the nuts start to give off their aroma.
Meanwhile slice the zucchini into rounds about 1/4 inch thick. For large rounds slice them again into half moons. Lay the cut pieces out flat on the cutting board and sprinkle them with salt and pepper. Flip them over. Sprinkle the backside with more salt and pepper.
Toss the seasoned zucchini rounds into the pan. Cook until desired donenesss. The zucchini will start to become transparent the more done they are. I like mine a little firm so I don't cook them too long. Make sure you flip them over and sear the back too.
Once they are done, transfer them to plates and allow to cool (they get very, very hot!). If desired sprinkle with fresh parmesan or mozarella cheese. The cheese is not necessary if you don't have any on hand. I make this dish all the time without cheese and it is just as good.
I love this recipe because it is fast and simple and it tastes really, really good. I love walnuts and put them in almost everything however this dish works with other kinds of nuts too. I've made it with pecans and it turned out very good then too. You can also use half zucchini and half yellow squash to give it a little more color.
Bon appetit!
Wednesday, July 16, 2008
CSA: Week 9
I did not get these flowers in my CSA share this week. I cut them from the zinnias in my own garden on Tuesday night and brought them in the house to make a little bouquet. If you cut the zinnias when they bloom you will be rewarded with even more flowers later!
A couple more new things in the CSA this week! I received:
Yellow squash
Sweet basil
Red and yellow salad tomatoes (like cherry tomatoes)
Rutabegas
Sorry no picture this time. Just couldn't quite get around to it. I'm excited to try the rutabega. It looks similar to a turnip but bigger. If anyone has any rutabega recipes please send them my way.
I was supposed to get eggs this week but did not. The eggs did not get sorted and packed in time. I'm okay with that since I still had a dozen from two weeks ago! It's harder to use up a dozen eggs in two weeks than I thought when I signed up for this program. Oh well. I'm still glad I have the eggs. A dozen every four weeks was the other option and that just doesn't seem like enough. I luuuuuuvvvvv these eggs. They are so tasty.
I also went to the farmers' market this morning. Everything looked so yummy and I had not eaten breakfast yet so I went a little crazy. I bought a cucumber, a tomato, potatoes, the cutest little red onions, cilantro, blueberries and peaches. I plan to make salsa with the tomato, red onions, cilantro and my banana pepper from last week's CSA that I still haven't used.
I spent a few minutes talking to one of the farmers at the booth where I bought the potatoes and red onions. He was really nice and honest with me about which items he home grows and which ones are shipped in from other states. That is kind of a beef I have with my farmers' market. There are vendors there who simply buy and resell the produce. There was a booth there this morning with Georgia peaches. Helloooo I live in the midwest. And if I wanted peaches from Georgia I can go to the grocery store and buy them for cheaper. What's the point of buying them at the farmers' market if they are not locally grown?
I've made it a point to ask the vendors if they grow their stuff locally or not. Some of them are perfectly nice about it and just say yes or no. One guy told me this morning that no he did not grow his red onions but the lady in the next booth did which I thought was nice of him. Some other vendors get very defensive when you ask them or are just plain rude about it. Then there was the guy this morning that was like "Duh of course I grow all this stuff" when I asked him like I was a moron for even thinking he didn't grow his stuff himself.
I appreciate the vendors that post signs saying "locally grown!" or "grown in such and such local town." But how do you really KNOW it's grown there? They could have their kids in the back of the van peeling the little stickers off the Georgia peaches, repackaging them in cute little farmers market bins and claiming them as locally grown!
I guess you just have to trust people.
Previous CSA posts:
CSA: Week 8
CSA: Week 7
CSA: Week 6
CSA: Week 5
CSA: Week 4
CSA: Week 3
CSA: Week 2
CSA: Week 1
Monday, July 14, 2008
Garden: Welcome Eggplant
After a wonderful weekend away it's back to regular life and back to the garden. I thought I would miss it while I was away but actually it was a really nice break. I was excited though to get out there last night and see how everything had changed in my three days away. First let me update the count:
Zucchini - 30
Bush beans - 522
Pole beans - 16
Grape tomatoes - 2
The garden is on the brink of getting out of control. The plants have started growing into each other and all crazy-like. The watermelon is all over the place. The pole beans have started to bend their support system. I think one of the zucchini plants has started its death rattle. It's not as full as it used to be and the middle of it is starting to look like it's dying. I wouldn't be that upset if it died because I could use some extra space in the garden! And I already have a freezer full of zucchini (and one other living plant).
We now have an eggplant - yeah! This plant is actually called a Whopper Eggplant so I assume that means it will produce very large fruit. Right now this fruit is about the size of a baseball.
There are five large watermelons on the vines:
The peppers are getting really big. There are quite a few of them and the plants keep producing more flowers.
This zucchini was hidden under a leaf and was allowed to grow as big as my arm!
This one actually came off the plant that I believe is now dying. I picked it on Sunday evening. Before I left town last week I found blossom end rot on this plant. Blossom end rot is caused by a lack of calcium in the plant. Basically it is what it says it is. The fruit starts rotting on the blossom end before it matures. Two zucchinis were lost to blossom end rot and were chucked in the compost bin. To fix this problem I sprayed the entire plant with a milk and water mixture and then poured some of the mixture onto the soil around the plant. I also crunched up some eggshells and dug them into the soil around the plant. Eggshells are supposed to release calcium into the soil. Apparently all that stuff worked because when I got back on Sunday that gigantic zucchini was on the plant and there was no sign of blossom end rot!
Tuesday, July 8, 2008
CSA: Week 8
Finally some new stuff in the CSA share this week! Tonight I received:
Turnips with greens
Yellow squash
Banana pepper
Sweet basil
I was happy to see a yellow squash for a change. I've about had enough zucchini and it's only been seven days since I picked the first ones. I'm not quite sure what to do with this banana pepper so if anyone has any suggestions please pass them along. By next week we are supposed to have some larger shares.
Tonight I picked three more zucchini and 90 bush beans! It rained like crazy this afternoon. The rain gauge showed an inch and a half of rain so it was really muddy out there. I just put on my boots and slogged through it. I read somewhere that you are not supposed to touch the leaves of bean plants when they are wet because you might pass bacteria or something on to them. I was afraid though that if I missed a day of picking green beans that the production might slow down or else I would have twelve inch long beans. So I decided to risk it and picked through them anyway. Ninety beans later I was covered in mud and ready to go inside. I didn't have the energy to wash, blanch and freeze them tonight though. I'll have to do it tomorrow.
My bush bean plants have also started to lay down. Is this normal once the plants start producing beans? It started with one plant, then two and now a bunch of them are leaning over on the ground. They still seem to be producing beans just fine though so I guess I won't worry too much about it.
I also noticed that we have an eggplant growing! It's been wrapped up in it's flower for days but I noticed the base of the flower swelling and swelling and finally today I could see some shiny purple skin peeking through. I will post a picture once there is more to see.
The watermelons are even bigger today than yesterday. I'm going to have to start posting a little update on the garden almost daily now since there is so much activity going on. I'm going out of town this weekend so I'll be away from the garden for three days. The watermelons will probably be as big as bowling balls by the time I get back. Ha.
Current zucchini count - 18
Bush bean count - 193
Previous CSA posts:
CSA: Week 7
CSA: Week 6
CSA: Week 5
CSA: Week 4
CSA: Week 3
CSA: Week 2
CSA: Week 1
Monday, July 7, 2008
Garden: Green Bean Production is in Full Swing
It is late. I am tired. I just spent a long time cutting, blanching and bagging several zucchinis and green beans for the freezer. I put up everything I had picked including the 67 bush beans and three zucchinis I picked today. Because I know that tomorrow there will be even more beans to pick and probably more zucchinis. I started off picking 10 bush beans on Saturday. Then yesterday I picked 26. Today I picked 67. We'll see what tomorrow will bring! Here's what I picked today:
That red thing is one lonely grape tomato that FINALLY ripened. I probably could've left it on the plant another day but I just couldn't stand it. I had to pick it. Here's a picture of it on the plant before picking:
And now for the picture that I really wanted to post tonight and the main reason why I am still awake - the watermelon! I went out to the garden tonight after work and I kid you not this watermelon had doubled in size at least since yesterday. Yesterday it was about the size of an egg. Today it is about the size of a baseball. I couldn't believe it! There are actually two of them that are this big.
The watermelon vines have really spread out and are starting to invade the space of some of the other plants. I am trying to redirect their growth to other areas.
I have several peppers now on my pepper plants and lots of blooms. This one is about the size of a golf ball. I saw yellow bell peppers at the store the other day for $1.50 apiece! It will be nice to have them right in my own garden.
Roma tomatoes:
Big boy tomato:
And finally the sunflowers are now officially as tall as I am. Look at how much taller they are compared to the compost bin:
Zucchini count - 15
Bush bean count - 103
Grape tomatoes - 1
Sunday, July 6, 2008
Zucchinis Galore! And How to Preserve Them...
Current zucchini count: 12
Yes I have picked 9 more zucchinis since the first three I picked last Wednesday. I picked two more on Thursday, three more yesterday and four today. Two went into my freezer, and three were eaten on the fourth of July which leaves seven in my refrigerator right now! At least there were seven earlier this evening. There are less now because I made something with two of them. However I won't get to try it until tomorrow so I'm waiting to post about it until then.
I have also started picking bush beans. Yea! I picked ten beans yesterday and then 26 beans today. I also picked one lonely strawberry which looked really pretty however something took a bite out of one side so I won't get to eat it. Sad...
Anyway back to the zucchini. So the two that I froze...how did I do that? It was actually really easy. I followed the instructions provided by Pick Your Own.
First you need to assemble all the equipment: big pot, big bowl filled with cold water and ice, knife and cutting board, slotted spoon, freezer bags or food saver with bags, and a sharpie.
1. Get some zucchini and wash it.
2. Bring a big pot of water to a full rolling boil.
3. Cut zucchini into slices or spears once water is boiling.
4. Immediately put cut zuchinni into boiling water (don't cut too far ahead of time and only cut enough zucchini for one blanching at a time)
5. Start timer immeditely - boil for three minutes
6. Remove zucchini from boiling water and place into bowl with ice water (prevents overcooking). Leave zucchini in the ice bath until cool, about five minutes
7. Remove zucchini from ice bath and put in strainer to drain for 2-3 minutes
8. Label freezer bags with "Zucchini" and the date
9. Put zucchini into bags and seal, removing as much air as possible.
The boiling followed by a rapid cool down is called blanching. Blanching veggies before you freeze them helps them to stay fresher longe.
I can't vouch yet for how the zucchini taste after they have been frozen and then thawed. I can say that this is a very easy process and does not take up much time at all. You don't have to have a mountain of zucchini either. The process is so simple and quick that it's worth it for only a couple zucchinis.
Thursday, July 3, 2008
Mulberries
Until recently the mulberry trees in our yard and our neighbors yard have been nothing more than a nuisance. They drop berries all over the yard and the birds eat them and then poo purple everywhere.
Then one day last week FIL started talking about mulberries and how him and his sister used to eat them all the time when they were kids. He said I should pick some off the trees in the backyard and make something with them.
Duh.
I guess I never really thought about actually eating them or cooking with them. Mulberries aren't sold at my local grocery store and they aren't an ingredient that pops up regularly in recipes.
Regardless last weekend I did some research online on mulberries. Turns out they are very similar to blackberries and they are pretty good for you. I found a few recipes that looked good too. It seems there are other people in the world who pick mulberries off trees in their backyard and eat them.
So I decided to pick some berries last Sunday. I took a big bowl out to the backyard and starting picking any ripe berries that I could reach.
There are two trees in our neighbors' yard and one tree in our yard. The neighbors' trees hang over the fence though so I say that anything hanging over into my yard is fair game. The trees produce a black mulberry so the darker the fruit is the more ripe it is.
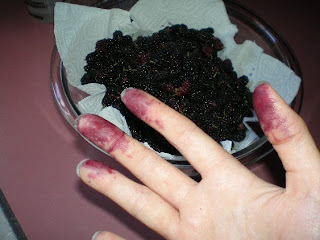
I picked a huge bowl full of berries in no time. And that was only the berries I could reach. There were tons of berries up higher that I could've gotten with a step stool. Be warned however that mulberries can stain everything purple. Do not wear nice clothes to pick mulberries.
I wanted to freeze some of these berries because I knew I wouldn't be able to use them up very quickly. Pick Your Own has freezing instructions for all types of berries. First wash the berries very well in several changes of cold water. I also rinsed mine in a bowl full of water mixed with a tablespoon of apple cider vinegar.
Then spread the berries out in one layer in a shallow dish or baking sheet that will fit in your freezer. This will help the berries freeze individually. If you stuffed the berries in a ziploc and then froze the whole bag the berries would freeze into a big clump.
Place the dish(es) in the freezer and leave for several hours or overnight. Any size dish will work. I used a pie plate, a shallow casserole dish and these two small casserole dishes.
Once the berries are frozen then you can place them all in a ziploc bag or foodsaver bag. Be sure to squeeze as much air out as possible.
I had to eat one of these berries though. But I don't know...there's just something about these berries that freaks me out a little bit. I don't know what it is exactly but I had to cut the berry in half before I could eat it. I had to see what was inside first.
It was really similar to a blackberry. It wasn't very sweet though, at least to me. I wasn't sure that I really liked them plain. But then again I don't like blackberries plain all that much. I like them when they are mixed into things or when they are a part of a recipe. But I never just sit around and eat them like I could blueberries or strawberries.
I plan to try them in several different recipes. I found a muffin recipe and an ice cream recipe so I would like to try both of those. I also found several jam and preserves recipes that I want to try as well. We'll see how it goes.
Mulberry links:
Mulberry Wiki
Natural Living Cuisine - Fresh Mulberries
Pick Your Own - Freezing berries
Wednesday, July 2, 2008
Garden: First Zucchinis
You know that zucchini I found in my garden on Monday? Well here's what it looked like today, only two days later:
Turns out I had three that were ready to pick today:
And that one was as big as my foot!
There is a fourth zucchini that probably could've been picked but I decided to leave it on the plant for one more day so it could get a little bigger. We plan to eat these on Friday with our fourth of July barbeque. Hopefully they taste good!
Tuesday, July 1, 2008
CSA: Week 7
Not much going on in the CSA share this week. Same stuff I've been getting before:
Turnips
Turnip Greens
Green onion
Eggs
For the first time in 6 weeks I did not get mustard greens!
Karin said that there are some bigger vegetables like squash and tomatoes on the vine however they were not quite ripe enough today to harvest. Hopefully next week! I'm really ready for something new.
I received eggs again this week even though I received them last week too. Last week was a make-up week from the week before when the hens were on strike so now I am back on track. I love getting the eggs however I'm having trouble using them all within two weeks. And now I have two dozen eggs in my refrigerator! Guess I'm having eggs for breakfast tomorrow. I might also give some to my grandma so she can make deviled eggs. She makes the BEST deviled eggs. Hmmm. I probably need to get that recipe from her...
Tomorrow I'm off to the farmers' market to get a few things before work. Then tomorrow night I think my first zucchini will be ready to pick! Yessssssssss.
Previous CSA posts:
CSA: Week 6
CSA: Week 5
CSA: Week 4
CSA: Week 3
CSA: Week 2
CSA: Week 1
Joining a CSA
Subscribe to:
Posts (Atom)