Saturday, December 8, 2007

Bachelorette Party Veil

About a month ago one of my very best friends, Jenny, got married. We’ve known each other for more than 20 years. She was maid of honor at my wedding and I was matron of honor at her wedding (matron makes me sound OLD).

Jenny’s bachelorette party was the weekend before the wedding. If you’ve ever been to a bachelorette party, you know that the bride-to-be always wears something to make her stand out in a crowd. Jenny is not the type of girl to want to go all out wearing feather boas and a tiara and a big sign that says “Last Night of Freedom!” I wanted to make her something simple, pretty and very un-tacky.

A veil.

Now if you’ve ever been a bride you know that REAL veils are ridiculously expensive. Plus we were planning a rowdy night out at a smoky bar so there was no way I was going to spend a ton of money on something that could possibly get stomped on or stained with beer.

I had an idea in my mind of what I wanted to make so on the day of the party (I’m not a procrastinator) I hoofed it on up to Wal-Mart to procure my supplies.

One yard of tulle = $1.12
One headband (about ½ inch wide) = $0.97

Total money spent = $2.09

That is all you need to make a very basic veil. Tulle comes in all sorts of colors so if your friend is not into white, make her a veil in her favorite color. Remember it’s all about the bride so think about what SHE would want, not what you want. If you want a veil then make your own. You can wear it around your house while you vacuum (actually that’s not a bad idea….).

Begin by cutting the tulle into two pieces that are a ½ yard each. They do not have to be exactly equal, but should be fairly close. You could also ask the fabric person at the store to do this when you are buying your fabric – one less step to do when you get home.

Next you will sew a tube or hem into the fabric to thread the headband through. Take one piece of tulle and along the side you cut, fold the fabric over about one to one and a half inches and pin. Again this does not have to be even or perfect. You just need a tube big enough to fit around your headband. Once the fabric is all scrunched up you won’t even be able to see the sewed part.

Now sew a seam where you pinned your fabric down onto itself. I used my sewing machine. If you are using a sewing machine, use a wide zig zag stitch and go slow at first as the tulle bunches up easily. If you do not have a sewing machine just sew by hand. Once the tube is complete on the first piece of tulle, repeat with the second piece.

Thread the headband through the tube in both pieces of tulle. Scrunch it all up on the headband so it fits. Make sure both seams are underneath. Your basic veil is done.


I felt like it needed a little more pizzazz though. First I had to find something on which to balance the veil while it was being decorated. I used a beer glass. I then rummaged in my craft drawer and found some silver gemstone, crystally things. I glued a whole bunch of them on the back. I used a dot of regular Elmer’s glue on the back of each gem and then pressed it onto the tulle using my finger for support on the other side.


It was still lacking something. Back in my craft drawer I found some spray adhesive and a big jar of silver glitter. I sprayed sections of the veil with the spray adhesive and then shook glitter all over it. The result was so perfect! It was so sparkly but not too tacky at all (to me anyway).


So is it worth it? Well Jenny loved her veil and she wore it all night. She left a trail of glitter everywhere she went. We all had a fantastic time. It was probably the best bachelorette party I’ve ever been too.


The veil was really easy to make, but more importantly it was really FUN to make, especially for a crafty person like me. I think it meant more to Jenny that I made it, rather than just going out and buying a veil or something else for her to wear.

Making a veil also allows you to personalize it for the bride. You can glue whatever you want to the back of it and do all sorts of different colors. If I made one again I would like to bind the sides of the headband with ribbon so the tulle doesn’t slide off the ends and I might also try trimming the edge of the veil with lace or feather boa or something equally as fun.

Depending on how you make the veil and what supplies you have on hand and have to buy, making the veil instead of buying it can also save you some money. You can buy the bride an extra drink later that night.

I was very proud of this veil! I have two friends getting married next summer so maybe I’ll get to make one again sometime!

Friday, December 7, 2007

Peculiar Spice Company: Cheesy Chicken Soup

I discovered the Peculiar Spice Co. a few years ago at a local craft show that MIL operates called Craft Patch. There was constantly a traffic jam of people around their booth because they were giving out free samples of all their products.

Peculiar Spice Co. produces and sells mixes: soup mixes, dip mixes, sweet mixes, side dish mixes. They are located on the south side of the Kansas City Metro area in a town called Peculiar, MO. It is now obvious where they got their name.

Of course I had to sample every single product that they offered and let me tell you, their products were GOOD. Even though everything tasted so great, I never did buy anything until this year. I think it’s because the craft show was always close to the holidays and I never felt like I could spend any money on myself (even for food?!?).

Well I made up for lost time this year. I bought six of their mixes last Saturday at Craft Patch. And on Sunday I mixed up a batch of their Cheesy Chicken Soup.

To make the soup you need the following:

Cheesy Chicken soup mix
16 oz Velveeta cheese
2-3 cups cooked chicken
8 cups of water


I took the easy way out and bought canned chicken.

First combine the water, soup mix and chicken in a large pot. This soup makes 14 cups of soup so you really do need a fairly large pot. Simmer on the stove for 25 minutes then stir in the Velveeta cheese until melted. That’s it. Seriously that’s how easy it was.

And oh my goodness does it taste good. Whatever they put in that spice mix just gives it the best flavor. I wanted to gobble up the entire pot. Instead I paced myself and packaged up the leftovers to go in my freezer.

So how does this compare to other soups from a cost perspective? I thought I saved my receipt from my shopping trip so I could do this right but of course now I can’t find it anywhere. I think I can remember the costs. It shouldn’t be that hard since I only had to buy two things. Ok, the cost to make the soup is as follows:

Soup mix – $4.50
Velveeta cheese - $3.89 for a 32 oz brick and I used half of it so $1.95
12 oz can chicken $2.12
Water – negligible

Total cost - $8.57
Divide by seven, two cup servings gives us a cost of $1.22 per serving.

This is not bad at all actually. A can of Progresso or Campbell’s Chunky soup would cost around this much or more unless you caught it on super sale. The store bought version would often be less than the two cup serving as well. So if you wanted to stretch the batch of soup into 8 servings to be more comparable to the canned version, your cost would be only $1.07.

So is it worth it? I was really, really impressed with this soup. It tastes great and it was really easy to make. It would be easy to throw on the stove when you get home on a weeknight. I like to support local businesses whenever I can and I will definitely be buying from them again in the future. I am really looking forward to trying the other four mixes I have in my pantry: Chicken Enchilada soup, Mexican Fiesta soup, Hashbrown Potato soup, and Hawaiian Chicken salad. I actually bought two Cheesy Chicken soup mixes so I’ll be making this one again!

Peculiar Spice Co. does have online and phone ordering so if you are interested please check out their website.

Wednesday, December 5, 2007

Cream Cheese Frosting

This cream cheese frosting recipe is FANTASTIC. I was so excited at how great it turned out. The frosting recipe also comes from the cookbook Cupcakes! by Elinor Klivans and I made it to top my pumpkin ginger cupcakes.

Cream Cheese Frosting
Makes 3 cups

½ cup (1 stick) unsalted butter, at room temperature
6 ounces cream cheese, at room temperature
1 teaspoon vanilla extract
3 cups powdered sugar


It is important that the butter and the cream cheese come to room temperature before you begin. If you use those two ingredients straight out of the refrigerator the frosting will be lumpy and no amount of mixing will get the lumps out. Set the butter and cream cheese on the counter while you make your cake or cupcakes and by the time you’re finished they should be ready to go.

In a large bowl, using an electric mixer on low speed, beat the butter, cream cheese, and vanilla until smooth and thoroughly blended, about one minute. Stop the mixer and scrape the sides of the bowl as needed during mixing.


Add the powdered sugar, mixing until smooth for about 1 minute, then beat on medium to high speed for 1-2 minutes until whipped and creamy. The frosting is ready to use, or for flavor additions.


The best tool to use to frost a cupcake or cake is an offset spatula, as I mentioned for basic buttercream frosting. Now I have a picture of it:


This is a small one that I use for cupcakes. To frost a cupcake, scoop a big dollop of frosting out of the bowl with the spatula and plop it in the middle of the cupcake. The more the better!


Then flatten the dollop and spread the frosting around the edges of the cupcake, twirling it in your hand. You can do the same thing with a spoon if you do have or do not want to buy a special spatula. I like to leave a little bit of the cake part showing but that’s just my preference.


Voila – the perfect cupcake!


So is it worth it? This is the best frosting I’ve ever made so it’s a resounding yes for me. I swear I am never going to use frosting out of a can ever again. I can’t wait to make red velvet cupcakes to go with this frosting. And the next time I make homemade oreos I’m definitely going to use this frosting for the filling.

Monday, December 3, 2007

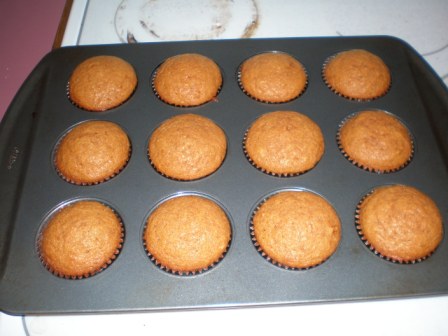
Pumpkin Cupcakes

I LOVE pumpkin. Pumpkin anything. Pumpkin pie, pumpkin bars, pumpkin bread, pumpkin muffins, pumpkin smoothies, you name it. So when I saw this recipe for pumpkin cupcakes I knew I had to make it for Thanksgiving. This recipe comes from the book Cupcakes! by Elinor Klivans.

Pumpkin Ginger Cupcakes
12 cupcakes

1 ½ cups unbleached all-purpose flour
¾ teaspoon baking powder
¾ teaspoon baking soda
¼ teaspoon salt
1 teaspoon ground cinnamon
1 teaspoon ground ginger
½ cup (1 stick) unsalted butter, melted and cooled slightly
1 cup sugar
1 cup canned pumpkin (not pumpkin pie filling)
3 large eggs
¼ cup (about 1 ½ oz) crystallized ginger cut into 1/8 to ¼ inch pieces

First I gather all my ingredients. Why do I do this? Because I want to make sure I really do have everything I need before I begin. It would be terrible to be in the middle of the recipe and realize you only have one egg left when you thought you had three because your husband decided to make an omelet yesterday after you left for work.


I could not find crystallized ginger so I decided to leave it out. The rest of the ingredients are common and I usually have them all on hand.

Preheat your oven to 325 degrees F and line 12 muffin cups with paper liners. I also spray my liners with non-stick spray.

Sift the flour, baking powder, baking soda, salt, cinnamon and ginger into a medium bowl and set aside. I use a sieve-strainer type thing to sift. You can also use an actual sifter (pictured below next to my bowl) but personally I hate those things so I never use it.


Next beat the melted butter, sugar and pumpkin together in a large bowl on low-medium speed until smooth. Mix in the eggs and crystallized ginger (if you were able to find it at the store).


On low speed, mix in the flour mixture until it is incorporated. The batter will be thick. In my opinion if you are not using a stand mixer I would mix the flour in by hand. You do not want to over mix the batter and I think it’s easy to do so with a hand held mixer. Over-mixing the batter will develop the gluten in the flour too much, causing the batter to become stringy and tough. This does not result in a tasty cupcake.


Fill each muffin cup with a generous ¼ cup batter. You do not have to measure this out exactly. I use a two spoon method when dipping out batter for muffins or cupcakes. Get out two of your larger spoons. Use one to scoop batter out of the bowl and make like you are going to dump it into the muffin cup. Use the other spoon to scrap the batter off the first spoon and into the muffin cup. Repeat. Just distribute the batter evenly among the 12 muffin cups.


Bake just until the tops feel firm and a toothpick inserted in the center of a cupcake comes out clean, about 25 minutes. That is what the recipe says. I ALWAYS set my timer for 2-5 minutes less than the lowest time called for in the recipe so I can check on my cupcakes or whatever I’m baking and monitor the last few minutes. Usually my baked good is done early. I’m super paranoid about burning stuff and this keeps that from happening.


Cool the cupcakes for 10 minutes in the pan. Then pop them out of the pan and onto a wire rack or paper towel and allow them to cool completely before frosting.

The best frosting for pumpkin cupcakes is cream cheese frosting! That will be a separate post this week and let me tell you – it was unbelievable.

So is it worth it? Um YES! These cupcakes turned out so good. They received rave reviews from my family on Thanksgiving. And they are made totally from scratch! I have not had a ton of luck making cupcakes completely from scratch so I was really pumped when these turned out so good. I usually use a mix and add a couple special ingredients.

If you are a fan of cupcakes, this cookbook has a ton of really great-looking recipes in it. I can’t wait to try more of them!

Monday, November 26, 2007

Buttermilk Wheat Rolls

For Thanksgiving I told my grandma I would bring homemade rolls. I'd only made homemade rolls once before and they only turned out okay. Since then though I’ve made several loaves of bread and countless pizza crusts so I figured I’d be okay. Or else I'd be running to the store for the heat 'n eat kind!

The recipe I chose is called Whole Wheat Buttermilk Rolls from the cookbook Baking by Carole Clements. I like this recipe because there’s only one rise instead of the normal two when making yeast breads.

Whole Wheat Buttermilk Rolls
Makes 12 rolls

2 teaspoons active dry yeast
¼ cup lukewarm water
1 teaspoon sugar
¾ cup lukewarm buttermilk
¼ teaspoon baking soda
1 teaspoon salt
3 tablespoons butter, at room temperature
1 ½ cups whole wheat flour
1 cup all-purpose flour
1 beaten egg, for glazing

I decided to double this recipe.

Begin by combining the yeast, water and sugar in a large bowl. Stir and leave for 15 minutes to dissolve. The yeast will make the liquid all bubbly. It's "burping" as Alton Brown would say.


Add the buttermilk, baking soda, salt and butter and stir to blend. The butter doesn’t really blend completely so just chop it up some and move on. It will be blended in when the flour is added.


Stir in the whole wheat flour. I used the paddle attachment on my stand mixer. Add just enough all-purpose flour to form a stiff dough. The recipe calls for one cup, but I used up to 1 ½ cups. At this point I switched to the dough hook attachment.


Transfer to a floured surface and knead until smooth and elastic. OR use the dough hook attachment to knead. The dough ball should come together and clean the sides of the bowl. If the dough is sticky, add more flour a little bit at a time.


Once dough is smooth and elastic, transfer to a floured surface (if you haven’t already) to shape the dough into rolls.


Divide into 3 equal parts. Roll each into a cylinder then cut each cylinder into 4 pieces.


Form the pieces into torpedo shapes (aka football shapes). Now unless you are an expert, it will be impossible to get them all the same size. And mine didn’t really look like torpedos as you can see below:


I’m not sure that it’s really necessary to form the dough into a torpedo shape. I think next time I will just make them round. Much easier!

Place on a greased baking sheet, cover and leave in a warm place until doubled in volume (about one hour). Tip: place pan over a bowl of warm water, like suggested for homemade pizza crust to help the rolls rise. Here’s what they looked like after one hour:


Preheat oven to 400 degrees F. Brush with the glaze. I forgot to do that part - oh well! Bake until firm, 15-20 minutes. Cool. Here’s how they turned out:


These rolls turned out really well! They looked really nice and they tasted great warm with butter. They were a hit at my grandma’s house. I thought they were really easy, especially with only one rise. I usually have all these ingredients on hand, except for buttermilk. Tip on buttermilk: if you do not have any buttermilk and your recipe calls for it, mix 1 tablespoon white vinegar with 1 cup milk and let stand for a few minutes to curdle. Use as directed for buttermilk in your recipe. I do this all the time and I can never tell a difference from real buttermilk.

I will definitely be making these again!

Friday, November 23, 2007

Cranberry Sauce

Until last year the only cranberry sauce I knew came out of a can. Turns out, homemade cranberry sauce is a snap to make.

Cranberry Sauce

12 ounces cranberries
1 cup sugar
1 cup orange juice

First rinse the cranberries and sort out any bad ones.


Next combine orange juice and sugar in a medium saucepan. Over medium heat, dissolve the sugar into the orange juice. You can tell the sugar is dissolved when you can't hear the sugar granules scraping on the pan when you stir. Once sugar is dissolved, dump in the cranberries.


Cook until the cranberries start to pop (about 10 minutes). You’ll be able to actually hear the popping. The cranberries will start to have cracks in them like this one:


As it cranberries break open and cook, the mixture will foam a little bit.


Remove from heat and place sauce in a bowl. Cranberry sauce will thicken as it cools.


Presto! Super simple and fast. I love my homemade cranberry sauce on rolls. If you have an extra fifteen minutes I think it’s definitely worth it to make cranberry sauce yourself rather than opening a can.

Tuesday, November 20, 2007

Turkey – Basic Cooking Instructions

In honor of Thanksgiving this week I thought it would be appropriate to write about how to cook a basic turkey. It’s actually fairly easy, it just takes a long time. I wish I could post pictures but we are not making a turkey this year. My husband LOVES to make the turkey but this year we decided to go to my grandparents’ house instead. So no pictures just some basic tips and instructions.

First you need to buy a turkey. Either fresh or frozen will work fine but if you buy a frozen turkey make sure you buy it several days before you plan to cook it. You should buy 1 to 1 ½ pounds per person you are serving.

A frozen turkey should be thawed in its package in the refrigerator. Allow one day for every 4-5 pounds. If you haven’t purchased your turkey yet and you plan to cook it on Thanksgiving Day, you need to buy a fresh turkey because you do not have enough time to thaw a frozen one.

Place the frozen turkey on a platter or in a dish to catch any juices. The last thing you want to do on Thanksgiving morning is clean turkey juice out of your refrigerator. Place the turkey on the lowest shelf possible, that way if juice does leak out it doesn’t leak all over everything on every shelf.

To begin preparing the turkey on Thanksgiving morning, begin by washing it. With the turkey in the sink, remove the wrapper and the package from inside the cavity. Although if you cook the turkey with the package inside I don’t think anything bad will happen because my husband did this the first time he made a turkey. We found the package when we were carving it – oops! Rinse the turkey with cold water, both inside and out. Let all the water drain out and off of the turkey and pat it dry with paper towels.

The next few steps can be modified to suit your tastes. This is just the way my husband likes prepare the turkey. Rub the outside of the turkey with a stick of butter. Stuff the inside of the turkey with citrus fruits – orange, lemon and lime halves – white onion quarters, celery, fresh poultry herbs and another stick of butter. Tie the legs of the turkey together to keep the all those goodies inside.

We prefer to use a disposable roasting pan and an oven bag to cook the turkey as it makes clean up extremely easy. Buy your roasting pan at the same time that you buy your turkey and make sure that your turkey will fit in the roasting pan!

Open the oven bag and toss in a tablespoons of flour. Hold the bag closed and shake to distribute the flour. The Reynolds website says this helps keep the bag from bursting. Then place the turkey inside the oven bag and set the turkey in the roasting pan. We like to cook our turkey upside down with the breast on the bottom. This keeps the meat really moist and eliminates the need for basting. Some people do not like to cook the turkey upside down because the turkey is not as pretty and brown when it is finished. I however am more concerned with the taste than the appearance so it’s upside down for us.

Now it is ready to bake. Put the turkey in a preheated 325 degree F oven and bake according to the following schedule for stuffed turkeys:

10-18 lbs 3.75 – 4.5 hours
18-22 lbs 4.5 – 5 hours
22-24 lbs 5 - 5.5 hours
24-30 lbs 5.5 – 6.25 hours

Unstuffed turkeys will not take as long. Check on your turkey periodically and then at the beginning of the time range start testing the temperature. A turkey is done when it is browned and a thermometer stuck in the thigh reads 165 degrees F.

Remove turkey from the oven and allow it to rest for at least 30 minutes. Now is the time to bake all your side dishes. After the turkey has rested you can carve and enjoy! I have absolutely no tips on carving a turkey. FIL always does it. An electric knife helps but that’s all I know! When dinner is over you can just throw out the entire roasting pan and oven bag with all the scraps left in it.

Here’s a really funny practical joke you can play on the host and hostess at your Thanksgiving dinner. Bring a cooked Cornish hen with you to dinner but keep it hidden. Have someone distract the host and hostess while they turkey is being carved. Place the Cornish hen inside the turkey’s cavity and then say, “You had a pregnant turkey!” and point out the Cornish hen. Have your camera ready to take a picture of their shocked faces because it will take them a minute or two to realize that a. turkeys lay eggs and do not have live babies, b. if a turkey was indeed pregnant, the baby would not be headless and defeathered inside its stomach. Trust me I know. I’ve had this joke played on me and I’ve never laughed so hard in all my life. Good times, good times.

Happy Thanksgiving!!!! Tomorrow is homemade cranberry sauce.